Part 6 on Fermentation: Sauerkraut Success

Published by Friday, August 31, 2012 Permalink 0

Part 6 on Fermentation: Sauerkraut Success

by Diana Zahuranec

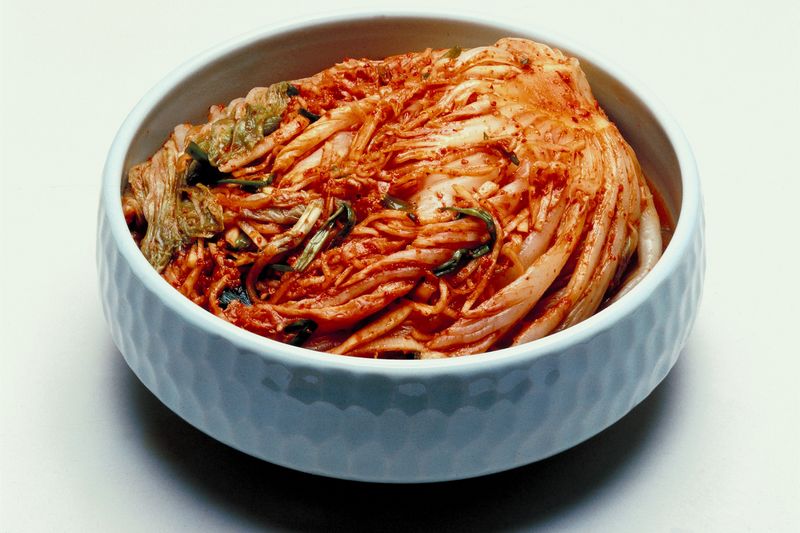
I filled two scalloped blue bowls with homemade sauerkraut and kimchi, sat down, and taste-tested.

I was hesitant, but I was encouraged by the lack of mold.

Kimchi wanna-be and sauerkraut

After two weeks of pushing down the bottles that weighed on my sauerkraut and “kimchi” (which was not actually kimchi, but will be referred to as such because that’s what I wanted it to be), I balanced the heavy, full bowls of vegetables on a flimsy, plastic tray and carried them to the kitchen counter.

I removed the bottles filled with water, the plates, and then the bags (why all this? Here’s why in Step-by-step Fermentation). I began to pour the mix into large containers of what once held 1 kg of yogurt, but I stopped when I lost too much liquid.

I assumed that the liquid of fermented vegetables contains all the healthy nutrients  that can be found in the vegetables themselves. I didn’t want to lose that, although I remain baffled as to what I could do with it, and haven’t found great sources backing up my Water-From-Fermented-Vegetables-Is-Healthy Theory (yet).

So I stuck my hand in and scooped it all out, pouring the liquid over top at the end. The liquids also help to preserve the vegetables when you store them in the refrigerator, and many say that the flavor improves as the fermentation slowly continues. And another reason to save the water: use a bit mixed in with the brine the next time you ferment vegetables, helping to jump-start the fermentation process.

According to Nourishing Days, ferments with 1-2% salt content will store for 4 to 9 months.

I filled two of those yogurt containers and some glass jars, or about roughly 13 cups of sauerkraut and kimchi from almost the same amount of vegetables. I had read that the vegetables will shrink as they lose their water, but the before:after ratio was nearly the same.

Success! They were both delicious. There was not a hint of rot. In fact, although many sources claim that it’s highly probable that you’ll lose some of your batch – especially a small one, like mine – due to air or uneven fermentation, I lost no more than a few shreds of cabbage.

Both were crunchy and flavorful. The pure cabbage had a more delicate flavor, and a bit of lactic acid tang. When I made the brine, I also added a teaspoon or two of yogurt whey to help . Sauerkraut naturally has a  lactic acid flavor, so I’m curious to see if fermented vegetables without added whey would give off that taste as strongly. Fermentation Project Number 2?

The kimchi was spicy from the chili pepper flakes and chopped hot peppers I added, and the mix of vegetable textures was delightful. The tastes all ran together – a carrot didn’t taste much different from a chard stem. And the chard stems were tougher than I wanted; but on second thought, it’s great that everything retained its crunchy structure. Mushy vegetables can be the result of not adding enough salt; I also read on Nourishing Days that tannins keep the structure of the vegetables intact, so you may be able to add grape leaves, for example, to retain crunch.

And now I’ll admit that I tentatively drank the fermented water, out of curiosity and refusal to waste something healthy. Its flavor wasn’t offensive, just mostly salty. I decided it might be healthier to forgo the salt than to absorb the other nutrients in there. And drinking fermented water just doesn’t sound very appetizing.

Never miss a post
Name: 
Your email address:*
Please enter all required fields
Correct invalid entries

Part 5: Kimchi vs. Sauerkraut – Fermenting Vegetables

Published by Wednesday, August 8, 2012 Permalink 3
cafemama / Foter / CC BY-NC-SA

Part 5 on Fermentation: Kimchi vs. Sauerkraut – Fermenting Vegetables

by Diana Zahuranec

Once again, Harold McGee’s The Science and Lore of the Kitchen comes to the rescue.

In fermented vegetables, remember that the two components that determine aroma and flavor are the salt concentration and temperature of fermentation. Those are the two main differences between kimchi and sauerkraut.

Bowl of kraut, by Diana Zahuranec for The Rambling Epicure, editor Jonell Galloway.

Bowl of kraut.


Sauerkraut, besides being cut more finely, has no other ingredients besides cabbage and brine. It ferments at 64-76 °F/18-24°C for 1 to 6 weeks. Its final salt content is 1-2%, and its final acidity level is 1-1.5%. That higher temperature for sauerkraut results in more lactic acid bacteria, giving it a tangier flavor.

Kimchi is cut into larger chunks and includes plant leaves and stems, too; and hot Korean chili pepper, garlic, and fish sauce are added for flavor. It’s fermented at a lower temperature than sauerkraut at 41-57°F/5-14°C for 1-3 weeks, with a higher salt content in the end (3%) and lower acidity (0.4-0.8%).

Bowl of kimchi, Part 5 on Fermentation: Kimchi vs. Sauerkraut - Fermenting Vegetables, by Diana Zahuranec for The Rambling Epicure, editor, Jonell Galloway.

Bowl of kimchi.


Never miss a post
Name:

Your email address:*

Please enter all required fields
Correct invalid entries

Never miss a post
Name: 
Your email address:*
Please enter all required fields
Correct invalid entries

Part 4: Step-by-step Fermentation – How to Ferment Vegetables

Published by Wednesday, August 1, 2012 Permalink 0

Part 4: Step-by-step Fermentation

by Diana Zahuranec

How to Ferment Your Own Vegetables

I said in my first fermentation post that I found a couple of particularly helpful websites:

Sandor Ellix Katz, “Making Sauerkraut”
Mary N. Mennes, “Make Your Own Sauerkraut”
Recipes from a German Grandma, “Make Your Own Sauerkraut”

Katz’s was detailed and informative, and I completely trusted his judgment because he is the undisputed wild fermentation expert. Also, he helped my friends and I make cheese, which turned out edible, if squeaky. The unnamed German Grandma had pictures, which I took too and I’ll provide them here for you fermentin’ folks.

Equipment used:

2 big glass bowls
2 freezer bags
Saran wrap
Big plastic tray

Ingredients used:

Click here for French/British/American converter

1 head of cabbage
1 onion
2-3 hot peppers
2 carrots
Stems from a bunch of catalogna (chicory (or a type of), a leafy green with tough stems that I didn’t want to throw out)
1/3 C mildly spicy coarse hot pepper
Salt, water: 3 T salt per 5 pounds of vegetables
Whey from yogurt

Procedure:

Note: This outlines what I did, and might not be the ultimate, end-all-be-all way to ferment; I’m just sharing the experience and knowledge I gained along the way!

(chicory (or a type of), a leafy green with tough stems that I didn’t want to throw out)
1/3 C mildly spicy coarse hot pepper
Salt, water: 3 T salt per 5 pounds of vegetables
Whey from yogurt

Procedure:

Note: This outlines what I did, and might not be the ultimate, end-all-be-all way to ferment; I’m just sharing the experience and knowledge I gained along the way!

[caption id="attachment_27484" align="alignleft" width="319"] Chopped vegetables


Continue Reading…

Never miss a post
Name: 
Your email address:*
Please enter all required fields
Correct invalid entries

Part 3: What is Fermentation?

Published by Monday, July 30, 2012 Permalink 0

“Fermentation is one of the oldest and simplest means of preserving foods. It requires no particular kind of climate, no cooking, and so no expenditure of fuel: just a container, which can be a mere hole in the ground, and perhaps some salt or seawater,” quoted from the ever-insightful Harold McGee, author of On Food and Cooking: The Science and Lore of the Kitchen.

On Food and Cooking

Harold McGee’s “On Food and Cooking: The Science and Lore of the Kitchen”

vegetable


The third article in this mini-series is going to be scientific and a little bit nerdy. Get ready to learn the nitty-gritty behind fermentation.

Fermentation begins in the vegetable or fruit. The naturally-occurring microbes in the food proliferate under the right conditions – namely, under the lack of air. At the same time, these beneficial microbes suppress the growth of harmful microbes that rot the fruit or vegetable. The good microbes metabolize the plant’s sugars and carbohydrates before the bad microbes get a chance. In a way, fermentation is a “controlled-rotting” process: the difference between sauerkraut and rotting cabbage is which microbes are allowed to grow.

When protected from air, these microbes get to work producing lactic acid, alcohol, carbon dioxide, and other compounds and nutrients.

Ferments can be made by crushing the vegetables or fruit until enough liquid is let out, ensuring that the vegetables are covered and protected from the air. Usually, though, the vegetables need a little bit of help: salt draws out the liquids, sugars, and other nutrients, and so ferments are often dry-salted or submerged in a salt-and-water brine before being stored in a covered container.

Crushing: wine is also a form of fermentation

As the plants ferment, much of the material remains intact, hence crunchy kimchi and sauerkraut as opposed to being mushy or slimy (two problems which usually signify contact with air; check out a great troubleshooting link). As the vegetables ferment, not only do they retain their vitamins, but additional nutrients are formed in the process: namely Vitamin B, folate, and the production of enzymes. New flavors and aromas begin to develop, and continue to age and change for as long as you ferment your food.

The salt concentration of the brine and the temperature during fermentation are the two main components that determine which beneficial plant microbes flourish and, consequently, the flavors and aromas that result. Vegetables with a low-salt brine and fermentation under low temperatures will produce mild but complex flavors with Leuconostoc mesenteroides. Fermentation done in high temperatures will produce almost exclusively lactic acid bacteria, from the Lactobacillus plantarum microbe. Also, fermentations undergo a dual process: they produce the first microbe, Leuconostoc mesenteroides, which is then taken over by Lactobacillus plantarum during the second stage of fermentation.

Never miss a post
Name: 
Your email address:*
Please enter all required fields
Correct invalid entries

Part 1: Food Fermentation for Beginners

Published by Tuesday, July 24, 2012 Permalink 0

Part 1: Food Fermentation for Beginners

by Diana Zahuranec

Cultures all over the world and for thousands of years have developed fermented foods and drinks. Japanese miso, Korean kimchi, kefir from Eastern Europe and the Middle East, sauerkraut from Germany; yogurt, sourdough bread, and even chocolate are some examples. While scarfing down some quickly “pickled” carrots I had made, I thought, why not make real fermented vegetables? I have a penchant for salty, sour foods, so why not ferment a big batch of it? The nutritional value actually builds and multiplies in fermented foods. I would satisfy my cravings, indulge in a natural, traditional super-food, learn about an ancient practice, and have a project to boot.

To learn the scientific details behind fermenting, I picked up Harold McGee’s On Food and Cooking: The Science and Lore of the Kitchen. For fermentation how-to, I quickly found an article on Sandor Ellix Katz’s blog (who, before, helped my friends and I make cheese). For a fermentation step-by-step picture guide, I found Recipes from a German Grandma.


I wanted to settle the nagging doubt about using equipment no more advanced than big glass bowls picked up in a used goods store. Pickl-It jars, Harsch crocks , and other crocks aren’t found easily in Italy, my home-away-from-home, or if they were I wouldn’t carry them around on my back while biking from store to store in the sweltering heat. Ideally, I would use Pickl-It jars or a Harsch crock over my open crock method, because I’ve never fermented vegetables and believe I’ve already made a few mistakes (ahem…this I will find out in roughly two weeks). Small batches of fermenting veggies are prone to come into contact with air when using the open crock method, causing you to lose some of the precious little you’ve made.

I don’t know which I would choose over the other, but apparently there are Team Pickl-It and Team Harsch Crock sides to this debate.

Too late now. I’ll find out if my haphazard but enthusiastic open crock method works in about two weeks. That will be the turning point in my brief fermentation career in making a major decision: to buy or not to buy a Pickl-It jar.

Pickl-It jars


Along with growing doubts as I read about fermentation, the more fascinating information I find. This post will be just the beginning of a short fermentation series that sort of follows along with my own method: dive right in knowing the basics, then nervously twist a strand of hair as I read more about it, then fixate on all things fermentation.

Harsch crock. I didn’t have strong doubts about the open crock method. No one 500 or 2,000 years ago had Pickl-It jars or a standard Harsch crock. Unfortunately, and after I already had my kraut for a day and a half, the more I read about it, the more uncertain I’ve become. Sandor Ellix Katz’s directions seemed straightforward, but some other articles worried me.


Let the fermentation begin!

Here are some other links I found useful:

Make your own sauerkraut, by Mary E. Mennes
Comparison of Vegetable Fermentation Methods, by Kimi Harris
Homemade sauerkraut, by Jenny
Vegetable Fermentation Further Simplified, by WildAdmin
Fermented Foods Webinair, by Jenny

Never miss a post
Name: 
Your email address:*
Please enter all required fields
Correct invalid entries

UA-21892701-1