Wild Woman on Feral Acres: Eating in Season? Pick a Pack of Parsnips!

Published by Thursday, December 6, 2012 Permalink 0

by Esmaa Self

From the archives

Consider the parsnip. Sweet. Nutty. recipe. From fritters (recipe) to soup (recipe), homemade gnocchi (recipe) to curry (recipe), the mighty parsnip delivers folate, vitamin C, fiber and flavor. Even if you’ve never before tasted parsnips, my bet is that if you try one of these recipes, you’ll not only want more parsnips, you’ll want to grow your own (tips on that below).

Photo courtesy of Sharon Mollerus

Speaking of yum, here’s a recipe from Simple Organic Kitchen & Garden that I’ve adapted to fit the items in my pantry, notably dried tomatoes and porcini mushrooms. The original recipe is known as Parsnips and Chickpeas in Garlic, Onion, Chili and Ginger Paste. I added ingredients, skipped a couple others and decided to shorten the title to the equally descriptive Parsnips Piquant.

Incredible flavor, marvelous nutrition

RECIPE

PARSNIPS PIQUANT

Ingredients


Click here for Imperial-metric recipe conversion

2 pounds parsnips, cut into ½ inch chunks
½ pound dried chickpeas, soaked overnight and drained (or 2 cans)
1 ½ cups dehydrated tomatoes, reconstituted and chopped
1 ½ cups dehydrated porcini mushrooms, reconstituted and chopped
2 ¼ cups vegetable broth (made from reconstituting mushrooms and tomatoes, see below)
½ cup chopped mixed salted nuts (set aside)
8 garlic cloves, minced
1 small onion, chopped
2 inch piece of fresh ginger, peeled and chopped
4 medium Serrano chilies, chopped
4 Tbsp porcini and sun-dried tomato infused olive oil (or plain olive, sesame, or peanut oil)
1 Tbsp sesame seeds
2 tsp coriander seeds
1 tsp turmeric
1 tsp chili powder
1 tsp ground cumin
Fresh ground pepper
Plain yogurt


Instructions


  1. Presoak chickpeas.
  2. Cover chickpeas with fresh water and boil for 10 minutes. Reduce heat, letting it boil gently. Let cook for 60 to 90 minutes, or until done. Drain and set aside. (If using canned chickpeas, simply drain and set aside.)
  3. Set tomatoes and mushrooms in a bowl; cover with boiling water. Let cool. Reserve broth.
  4. Set about a quarter of the minced garlic aside. Put remaining garlic in a blender with the ginger, onion and half of the chilies. Add enough vegetable broth to make a paste (about ¼ cup).
  5. Heat the oil in a frying pan; add coriander seeds, turmeric and chili powder. Add garlic-ginger-onion-chili paste. Stirring constantly, cook until broth begins to evaporate. Add tomatoes; stir. Cook another minute or two.

    Simmer until liquid is reduced

  6. Add the parsnips, chickpeas and remaining water; boil, stir then simmer, uncovered 15 minutes or until the parsnips are tender but not mushy and sauce has been reduced.
  7. Stir in Serranos, sesame seeds and reserved garlic.
  8. Plate Parsnips Piquant, add fresh ground pepper. Sprinkle with chopped nuts and a dollop of yogurt. Garnish with parsley. Serves 4.
  9. Chapatis, naan and kulcha make a lovely accompaniment, as does homemade sourdough or wheat berry bread.

Growing Parsnips


Photo courtesy of Matthew Folley


The parsnip’s full flavor emerges after the plant has been exposed to near freezing temperatures, thus this root crop is considered a winter vegetable. Here in Colorado where we redefine cool, if not winter, a person may scoff at the very idea of growing a slow maturing vegetable. But parsnips are the only root crop that can survive in the ground all winter. Indeed, it is one of the few crops with which high elevation gardeners might achieve success. (source)

According to Shane Smith, in his book, Greenhouse Gardener’s Companion, parsnips require bright light, cool temperatures and may go to seed if overwintered. So you might wonder if I’ve slipped a cog when I mention that I grew two small patches of parsnips last winter in our attached passive solar greenhouse and that both test plots were partly shaded and further  that one of the beds regularly reached air temperatures above 87 F.

However, if I mentioned that I fully intend to seed parsnips again for Colorado’s less industrious, though longer, growing season (AKA winter), you might want details regarding these attempts. You are in luck.

Two tries, two successes

I planted one batch in early August for inclusion in December’s root crop rich menus. This first sowing was in the raised bed nearest the southern greenhouse vent, which is the bed furthest from the main house’s southern wall and which is largely shaded in winter, thus the coldest spot in the greenhouse. The soil does not freeze, though air temps do occasionally reach the mid 30s. The parsnips we harvested from this test plot were every bit as large and straight and lovely (not to mention sweet) as those we’ve purchased in the store.

In addition, I grew a dozen parsnips in the west wing. This second test plot is within three feet of the main house’s west wall. The bed receives afternoon sun, which in the winter months, means that air temperatures reach the nineties, but soil temperature remains between 50-65 F. In addition, overnight air temps are generally a few degrees warmer than those in the first plot. We planted the second crop of parsnips in mid-October and harvested them in late January. They were two-thirds the size of the others, but possessed incredible flavor. Parsnips from this plot are featured in the images of Parsnips Piquant, above.

Companion plants include peas, potatoes, peppers, beans, radishes and garlic. Get more parsnip growing tips here.

Read more about Esmaa’s organic farming techniques on her site Middleground Farm.

Never miss a post
Name: 
Your email address:*
Please enter all required fields
Correct invalid entries

Simple Sustenance: Herbal Warmth — Rosemary Potato Soup with Paprika Oil Recipe

Published by Wednesday, December 5, 2012 Permalink 0

Simple Sustenance: Herbal Warmth — Rosemary Potato Soup with Paprika Oil Recipe

by Renu Chhabra

Herbal Warmth — Rosemary Potato Soup with Paprika Oil

As for rosemary, I let it run all over my garden walls, not only because my bees love it but because it is the herb sacred to remembrance and to friendship, whence a sprig of it hath a dumb language.” — Sir Thomas More

Rosemary potatoes are my favorite all year long.

I always find myself circling around the oven when potatoes are roasting. Is it the intoxicating aroma of rosemary, or the anticipation of a warm bite of the potatoes?

I think it is both.

Hot from the oven on cool nights or at room temperature on warm days, they are always delicious. A cold nibble from the fridge does not disappoint me either. It is a classic combination that is very satisfying.

And who needs chips or french fries when oven-roasted spuds can treat our taste buds guilt free?

But today it’s about soup. My first pot of warm soup this season. And it’s rosemary potato soup.

A pot of familiar flavors simmered on stove top.

This soup has the same foundation of flavors. Fragrant rosemary perfumes the soup and garlic gives it pungency. In addition, I added  sauteéed onions and fresh scallions to it. Sautèed onions also used as garnish in this recipe, give a deep flavorful bite. A drizzle of paprika oil adds color and warmth to this soup.

This recipe is vegan, but you can add a little milk for creaminess. Also garnish with your favorite cheese, if you wish.

The basic soup can be dressed several ways with your choice of garnish. I have enjoyed a few combinations.

  • Kalamata olives, sun dried tomatoes, Pecorino cheese, and a drizzle of rosemary oil or plain extra virgin olive oil
  • Sauted or oven-roasted mushrooms with paprika oil
  • Basil pesto and bits of sun dried tomatoes
  • Caramelized onions, Parmesan cheese, and roasted hazelnuts.

Be creative and let your palate guide you. A basic soup with so many options to dress it with, See what you have in your pantry and fridge to brighten it to your liking.

I would love to hear your ideas.

Recipe

Paprika Oil

¼ cup olive oil
½ teaspoon paprika

  1. Warm olive oil in a small pot. Remove from heat. Stir in paprika. Whisk lightly to dissolve well. Set aside.
  2. If you like spicy, make chili oil instead.

Soup

3 tablespoons olive oil
2 cups onion, diced small
6 cups potatoes (3 large), diced small
5-6 large cloves of garlic, minced
1 teaspoon dried or 2 teaspoon fresh rosemary (or to taste)
Sea salt to taste
Pepper to taste
4-5 green scallions, chopped plus for garnish, chopped fine
3 cups water or vegetable stock

  1. Heat oil in a heavy-bottom pot and add onions. Sauté on medium-high heat for 8-10 minutes or until golden. You want some color, but be careful not to burn the onions.
  2. Set aside a tablespoon or so for garnish.
  3. Stir in garlic, potatoes, rosemary, salt, and pepper.
  4. Cook for a minute and add scallions and water or vegetable stock.
  5. Bring it to boil and cover the pot with a lid. Simmer for 25-30 minutes or until potatoes are cooked.
  6. Let it cool a little.
  7. Puree with immersion blender or in a blender to desired consistency according to your taste — smooth and creamy or rustic and chunky.
  8. Add a little water or stock if it is too thick. Adjust seasonings. Set aside.


To serve, heat the soup and ladle into bowls. Garnish with browned onions. scallions, and a drizzle of paprika oil. Serve hot.

Note: I used water but if you wish, you can use vegetable stock. Potatoes absorb a lot of flavors, so adjust flavors to your taste. Add as much or as little garlic, salt, pepper. Rosemary can be overpowering, if used in excess. Garnish to your taste. If you like spicy food, make chili oil instead of paprika oil.

Never miss a post
Name: 
Your email address:*
Please enter all required fields
Correct invalid entries

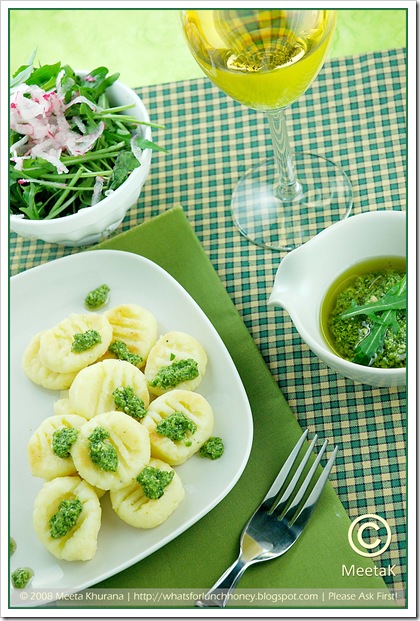
Recipe: Parsnip Gnocchi with Ruccola Cashew Pesto

Published by Thursday, November 29, 2012 Permalink 0

by Meeta Khurana Wolff

Recipe: Parsnip Gnocchi with Ruccola Cashew Pesto

From the archives

Parsnip Gnocchi (02) by MeetaK

Rock solid! That’s what the ice on my windscreen this morning was. It was so hard that here was no way my ice scraper was going to break any ice. At -5 degrees C my hands were freezing onto anything that had the slightest bit of moistness!

Winter has settled down comfortably in our parts. There was beautiful snow all through the Thanksgiving weekend and ever since, it’s been a bit dull, cold and icy.

Continue Reading…

Never miss a post
Name: 
Your email address:*
Please enter all required fields
Correct invalid entries

Arroz con Leche and Rice Pudding: Every Country has its own Version

Published by Wednesday, November 28, 2012 Permalink 0

by Marisol Murano

Small Plates: Rice Pudding

Arroz con leche in South America. Arroz Doce in Portugal. Kheer in India. Rice Pudding in the United States. What makes rice boiled in milk and sugar so irresistible? The secret may be in the grain.


The Indian version, made with basmati rice, spiced with cardamom and garnished with almonds and sultanas is exotically delicious. The Portuguese version, which calls for short-grain rice, egg yolks and cinnamon, is a creamy Iberian dream. My Venezuelan grandmother’s recipe called for long-grain rice and condensed milk.

Both the grain and the cooking method impact the creaminess of the final pudding. Whereas my grandmother’s and the recipes from Portugal boil the rice in water first, kheer is cooked in the milk. The major disadvantage of cooking the rice directly in the milk is that it tends to stick to the bottom of the pan and requires constant stirring to keep it from burning.

The recipe I have concocted after traveling the world as a Destination Chef and after experimenting with several exotic grain varieties is the best of all worlds. It includes my grandmother’s condensed milk, the Portuguese egg yolks in moderation, toasted almonds, and it is made with sushi rice. It is also true to both my eating and culinary philosophy that you can turn almost any guilty pleasure into a small plate to better savor it without the guilt.

In a final twist against the grain, I serve it warm, rather than chilled.

The Long and Short of it

Not all rice grains behave equally under pressure. Of the short grain rice varieties I tested for this recipe the sushi rice, also known as japonica, turned creamiest in the least amount of time.

The other varieties I used are listed below, along with some of their most distinctive features.

Varieties of Rice in the World

Arborio

This Italian short-grain rice is named after the town of Arborio in Italy’s Po Valley. It is often used for risotto and to make rice pudding as well. Because it is both creamy and chewy at the same time, arborio is great for rice pudding.

Arborio rice.

Arborio rice


Carnaroli

A medium-grain rice grown in the Vercelli province in the Italian Piedmont, carnaroli has a higher starch content than arborio. It is also a little firmer and the grain is a little longer than arborio’s. It worked great for the arroz con leche, but it takes about 40 minutes to cook and it is expensive.

Detalle del Grano del Arroz Carnaroli

Carnaroli rice


Sushi Rice

The Japanese short-grain rice used for sushi is oftentimes called japonica. It takes years of practice and patience to make sushi rice that is suitable for a sushi roll. After taking a class with a master sushi chef and realizing I could not wait 10 years to make the perfect rice, I decided on a shortcut: Why not use sushi rice to make rice pudding? The grain is very short and it absorbs the milk beautifully. You may also use a sushi rice variety grown in California, known as calrose.


Bamboo Rice

This isn’t a variety of rice, but rather a short-grain rice which has been infused with bamboo juice. This exotic grain has a lovely hue of jade and a slightly grassy taste reminiscent of green tea. It is also moist. I really hoped this would be my finalist because the color of the grain is lovey, the taste is subtle and the rice is full of nutrients. In the end, though, I found that to better appreciate its flavor subtleties this rice is better steamed or boiled. But if you want to indulge your inner panda, try it with white fish, sea scallops or chirashi (Edo-style scattered sushi).


Basmati

Of the long-grain varieties, basmati remained the crunchiest, even after boiling it in 10 cups of milk. I was aiming for creamy, so this wasn’t the rice for me.

Grown in north central India and Pakistan, basmati is a variety of long-grain rice. It is often used to make biryani, pulao and kheer. It has a sweet aroma reminiscent of pandanus leaves.

Basmati Rice

Basmati rice

Jasmine

Originally from Thailand, jasmine rice has a nutty taste and fragrant aroma. The grains will stick together when cooked, though it isn’t as starchy as the short-grain varieties. Of the two long-grain varieties jasmine made for the creamiest arroz con leche, but not as creamy as sushi rice.

Close-up of grains of jasmine rice

Close-up of grains of jasmine rice


The two secrets to this recipe are boiling the rice in water first and using sushi rice. Boiling the rice first also substantially reduces the overall cooking time. Because some of the starch is removed during boiling, I find this method keeps the rice from sticking to the bottom of the pan as well.

To download and print a PDF copy of my Arroz con Leche Condensada y Canela recipe, click here.

Recipe

Arroz con Leche Condensada y Canela

INGREDIENTS

For the Arroz con Leche:
 
2/3 cup sushi rice (4 ½ oz/125 grams)
6 cups water (48 fl oz/1.5 liters)
1/8 tsp salt4 cups milk (32 fl oz/1 liter)
1 tablespoon ghee, or clarified butter
1 cinnamon stick
1/3 cup sugar (2.5 oz/67 grams)
1 tsp vanilla extract
1 egg yolk, lightly beaten
½ cup sweetened condensed milk (4 fl oz/125 ml)

For the garnish:

1/3 cup blanched almonds (1.3 oz/ 36 grams)
1 teaspoon ghee, or clarified butter
Ground cinnamon

METHOD

Arroz con leche:

  1. Bring water to a boil in a saucepan. Add the rice and salt. Reduce to a simmer and cook, stirring occasionally for 20 minutes. Drain.
  2. Warm the milk in a saucepan. Add the ghee, cinnamon stick, sugar and vanilla extract and cook over medium heat until sugar is dissolved. Add the drained rice, lower the heat and cook for 25 minutes, stirring occasionally to keep the rice from sticking.
  3. Beat the egg yolk in a small bowl and add the sweetened condensed milk until combined. Gently stir condensed milk mixture into the rice and cook over very low heat, stirring constantly, for five minutes. Remove from the heat.
  4. Spoon arroz con leche into small serving cups and sprinkle with cinnamon. Garnish with toasted almonds. Serve warm.

Garnish:

  1. In a small non-stick pan toast the almonds in ghee over medium heat, stirring with a wooden spoon until almonds turn a light golden color, about 4 minutes.
  2. Set aside to cool.
__________________
Chef Marisol Murano is an international destination chef, writer and show host. Her latest book, Deliciously Doable Small Plates from Around the World, is an engaging travel adventure featuring 60 world classics in small plate format and glorious photographs from every corner of the world where she has worked as a destination chef.  For more information, visit her site Marisol Murano.


  • , is an engaging travel adventure featuring 60 world classics in small plate format and glorious photographs from every corner of the world where she has worked as a destination chef.  For more information, visit her site Marisol Murano.


  • From Tokyo: Quirk of Fate after the Quake, is an engaging travel adventure featuring 60 world classics in small plate format and glorious photographs from every corner of the world where she has worked as a destination chef.  For more information, visit her site Marisol Murano.


Never miss a post
Name: 
Your email address:*
Please enter all required fields
Correct invalid entries

In Europe, sometimes it has to be sweet potato pie instead of pumpkin for Thanksgiving

Published by Wednesday, November 21, 2012 Permalink 0

Tom and Maggie’s Thanksgiving Sweet Potato Pie

We’ve been making Thanksgiving dinner together for oh so many years — ever since we were in college in Paris. Since the pumpkin in France is always too watery, no matter what method of cooking we used and what type of pumpkin, we had difficulty getting it to set, so we decided to use sweet potatoes, which give a much more predictable and reliable result, which is absolutely necessary when preparing a Thanksgiving feast for a crowd of 20 or 30 convives. In addition, we’ve grown to like it better (perhaps because we know it will always set, unlike pumpkin?).

Continue Reading…

Never miss a post
Name: 
Your email address:*
Please enter all required fields
Correct invalid entries

Thanksgiving and Christmas Recipes: Cranberry-orange Relish

Published by Sunday, November 18, 2012 Permalink 0

Spontaneous Cuisine, by

From the archives

A healthier, tastier recipe than the traditional cranberry sauce

Cranberry sauce is of course a mainstay of any Thanksgiving dinner. In Switzerland, we eat a lot of game, so it is good to always have some on hand to eat with deer, wild fowl, boar, or whatever the hunters bring in.

This is a variation of the very plain, classic recipe. I’ve been using it for years. It’s easy, quick and a no-brainer. You can make it ahead of time (in fact, it’s better to make it a day or two before Thanksgiving). In addition, it keeps for ages, just like jelly or jam.

Recipe

Cranberry-Orange Relish

Click here for Imperial-metric converter

12 oz/375 g fresh cranberries
1/2 cup light brown sugar (if you like it really sweet, you can double the quantity)
1 tablespoon water
1 large navel orange
1 small sliver of ginger, finely grated (optional), or 1 stick of cinnamon (optional)
1/2 cup shelled walnuts (optional)
  1. Place cranberries in a large saucepan with sugar and water.
  2. Juice the orange and remove any white pith that lingers. Cut peel into small juliennes or zests, carefully removing any pith that is sticking to them. Add zests and juice to cranberry mixture.
  3. Add ginger (optional) or cinnamon stick (optional).
  4. Bring to a boil, then turn down heat, cover and cook until all the berries have popped open. This can take 20 to 30 minutes. Just be patient and keep an eye on them. If liquid evaporates before all the berries burst, add a just enough water to prevent them from sticking. Remove from heat.
  5. Taste and adjust sweetness if necessary.
  6. Pour into bowl you plan to serve it in and let it set. This can take a couple of hours, so it is advisable to make it well ahead of time, even 2 or 3 days. It keeps well in the refrigerator.
  7. When ready to serve, shell and chop walnuts. Add at last minute, right before serving (otherwise, they tend to get soggy).

This recipe was originally published on GenevaLunch.

Never miss a post
Name: 
Your email address:*
Please enter all required fields
Correct invalid entries

Sicilian Orange and Fennel Salad

Published by Thursday, November 15, 2012 Permalink 0


//

Sicilian Orange and Fennel Salad Recipe

by Diana Zahuranec

As fall slips into winter, the open air markets in Turin, Italy push nature’s seasonal fruits and vegetables to make early appearances in the crates and boxes stacked inside each bancarella, or stand. Oranges, grapefruits, and clementines from Calabria and Sicily showed their waxy globes in the middle of October; bitter turnip tops called cime di rapa were available by the end of September; spiky artichokes, still not technically in season, have been around for weeks.

The sweet, crispy finocchio, or fennel, one of my newly-discovered favorites, entered the scene two weeks ago at the beginning of November. Last year’s discovery that I’ve waited impatiently for since the end of September is the sweet, soft kaki vaniglia, the persimmon, which has a designated corner in my refrigerator. These bombs of juicy, fruity sugar are an after dinner treat that could almost replace autumn pies. Almost.

According to the illustrated and finely detailed wheel of seasonal fruits and vegetables that I bought at Eataly, citrus fruits have just begun their yearly cycle in November. I pat myself on the back, since I resisted buying these until a few days ago. There was one mysterious exception in the form of yellow-green skinned citrus fruits, easy to peel and sour-sweet inside. They came from Calabria, and the hulking, big man that sold them ensured me they were sweet and ripe, never mind their greenness. The man who sold them seemed to have been plucked from another time and place, where people can and still do pick oranges in the fields all day for decent wages, the weakening winter sun warm on their backs. His nails were dirty and his accent thick (presumably Calabrian).

Once at a food photographer’s studio in Emilia-Romagna, the chefs and food stylists there prepared a tangy, salty, sweet salad from the South. It had been inspired by the chef’s Sicilian roots. It’s now one of my favorite meals, and I have to wait for these seasonal fruits and vegetables before I can enjoy it. It evokes flavors from a land where the sun shines across fields with rows and rows of citrus trees, bright orbs decorating the branches in a warm Christmastime.

The traditional olives to pair with this are black ones, but I had green, which I might actually prefer. Being the salt queen that I am, a shot of capers hits the spot, but I don’t know how “traditional” that is. Also, blood oranges knock the pretty factor up a notch for this already aesthetically-pleasing plate.

Recipe

Sicilian Orange and Fennel Salad

For 2-4 people (depending on if using as a light lunch or as a side dish)


Ingredients

1 large fennel
1 medium orange
¼ red onion, sliced finely (or less)
¼ cup black or green olives, pitted and sliced thinly
Salt and pepper to taste
Extra virgin olive oil
Optional: 1-2 Tbsp capers, hot pepper
  1. Slice the fennel in half, and then core each half by cutting out the tough triangular sections at the bottom.
  2. Trim the ends, reserving green fennel leaves for garnish. Trim any bruised parts. Slice finely and set aside. Note: I also slice the very end green stems, because they’re strong in flavor and very crunchy. They may be too astringent for some tastes.
  3. Peel the orange. Setting it on its side, slice it very thinly so that each piece is divided into segments. Keep them as full round slices, or break them into halves or double segments.
  4. Layer the fennel, orange, and onion, then scatter the sliced olives over the top. Sprinkle with salt and pepper, drizzle with olive oil, and garnish with the fennel leaves. Add a dash of hot pepper and a sprinkling of capers if you so choose.
Never miss a post
Name: 
Your email address:*
Please enter all required fields
Correct invalid entries

Rosa’s Musings: Beet Salad with Cottage Cheese & Soft-boiled Egg

Published by Monday, November 5, 2012 Permalink 0

Rosa’s Musings: Beet Salad with Cottage Cheese & Soft-boiled Egg

by Rosa Mayland


Some people are not afraid of the cold and others regard it with utter contempt. Even though I can’t say I savor every season or mid-season of the year, I nonetheless definitely prefer the fresher season as I hate sweating excessively or getting sunburned like a shrimp on a barbie.

Sometimes I wonder if those predispositions are linked to my DNA or whether is it just a personal preference. What if our genes influenced our manner of conducting ourselves and our traits of character? Hmmm, that is quite a difficult question to answer, but I believe that if our health can be defined by our bloodline, then there are chances that our emotions, temperament and identity are also outlined by it.

You see, my father’s ancestors were Swiss mountaineers who might have had Danish or English origins (my family name is NOT Swiss at all). Then, on my my mother’s side they came from the rugged areas of Northern England where Viking settlers made themselves at home and also from European Russia, a place which is known for its dreadful cold.

Continue Reading…

Never miss a post
Name: 
Your email address:*
Please enter all required fields
Correct invalid entries

Recipe: Kids in the Kitchen: Making Homemade Halloween Treats with your Children

Published by Sunday, October 28, 2012 Permalink 0

by Jonell Galloway

American Jack-o’-lanterns. Photo courtesy of Nosajanimus.

Have you ever thought of making homemade Halloween treats, and getting your kids into the kitchen to help out?

Sharon Bowers’ book Ghoulish Goodies: Creature Feature Cupcakes, Monster Eyeballs, Bat Wings, Funny Bones, Witches’ Knuckles, and Much More! (Frightful Cookbook) arose out of her lifelong love affair with Halloween. Epicurious has featured some of her recipes and ideas in its weekly newsletter.

Continue Reading…

Never miss a post
Name: 
Your email address:*
Please enter all required fields
Correct invalid entries

Day of the Un-Dead

Published by Sunday, October 28, 2012 Permalink 0

by Alice DeLuca

The Day of the Dead and Halloween are nearly upon us and I am frantically digging for recipes that can protect the living against the Un-dead. Books and papers fly as I paw through shelves and piles, seeking something to ward off the Zombies, Vampires and Werewolves that may be lurking outside the door, or that may invade my kitchen at any moment. They all have highly specialized dentition designed to make swift work of the main course – me!

Day of the Dead Secretary Alice DeLuca 2011

I’m calling on restaurateurs —  please, this time of the year, an amuse-bouche for the living might be just the thing to calm the customer’s nerves. Could chefs please get a little creative, and instead of offering me a puddle of olive oil, or herbed olive oil, or olives in a lake of olive oil with obligatory bread (that I don’t eat anyway), could they provide something that will protect our table from monsters? Let’s get our priorities straight please; safety comes first!

Continue Reading…

Never miss a post
Name: 
Your email address:*
Please enter all required fields
Correct invalid entries

UA-21892701-1